How to setup boxes used for shipping?
In this document we will go over parcel packing settings of WooCommerce shipping plugin and talk about what they control and when you might want to change them.
We have prepared a tutorial video which will guide you through the proper configuration of the parcel box within the WooCommerce shipping plugin.
By following our step-by-step demonstration, you’ll be able to ensure that your parcel box is configured correctly and ready for use for your WooCommerce store. https://youtu.be/gvMW1SwJFX0
How does parcel packing work? #
This is a simplified description of how WooCommerce shipping plugin is estimating what shipping box(es) has to be used for shipping of the items.
- Plugin will sort boxes in Ascending order.
- Plugin will take a first unpacked item.
- It will calculate item’s volume as L * W * H.
- Plugin will compare total weight and volume of all the items (including the new one) against currently selected box dimensions and its max weight.
– If items don’t fit into a current box, then it will try to repeat Step 4 with the next bigger box.
– If no other boxes are defined then it will add currently opened box to a pile of boxes for shipping and put new item into a new smallest box where it can fit.
– If current item can’t fit into any of the boxes then it will be added to a pile of boxes for shipping as is. - If there are any unpacked items left, then plugin will go back to Step 2, otherwise it will add currently selected box to a pile and finish packing.
- Box weight refers to the weight of the empty box without any products inside.
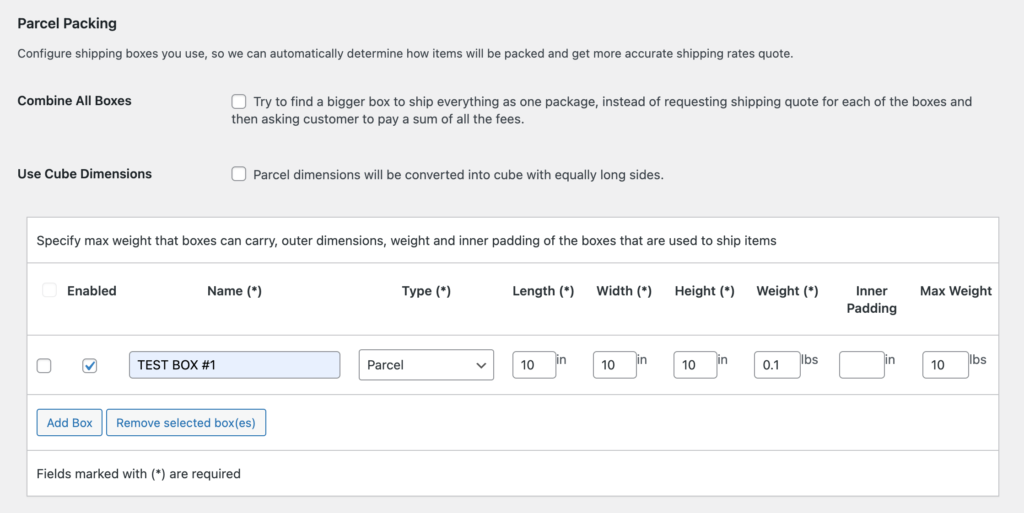
Combine All Boxes #
Typically WooCommerce shipping plugin will send a separate quote request for each of the boxes used to pack all the items in the cart and then it will sum all the returned rates.
You can enable Combine All Boxes if you want to ship entire contents of an order as a single box, which can help to save on shipping fees.
The way it works is that plugin will put all the boxes, that were estimated as necessary to fit all the items in the order, on top of each other and then it will use total dimensions and weight of this pile to send a single shipping quote request.
However, this feature may not be suitable for all scenarios, especially if your products are large in size. When the “Combine All Boxes” option is enabled, the plugin may attempt to consolidate all products into a single large package. In some cases, this can cause the final package dimensions to exceed the carrier’s size limitations, which may result in no shipping rates being returned.
Use Cube Dimensions #
The way it works is that it will calculate a volume of a box as L * W * H and then it will use this value to calculate dimensions of the box with the sides of an equal length like L = W = H.
It is useful when you have Combine All Boxes enabled and want to be able to find better shipping rates, because combined boxes with irregular sizes are typically more expensive to ship.
How to add a new box in WooCommerce shipping plugins? #
1. Hit Add Box button.

2. Fill in box details
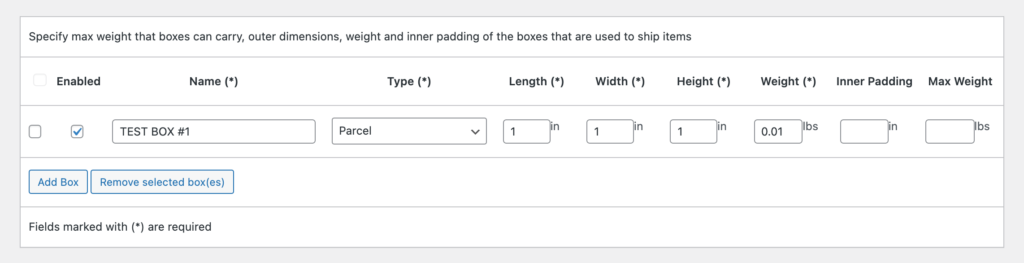
- Enabled – check this checkbox if you want plugin to use that box for packing.
- Name – name is required and works as a description will help you to easily identify that box.
- Type – in most of the cases it should be just a Parcel, but if you are using any special pre-paid boxes then you can choose it there.
Please note that any value other than Parcel might limit a selection of available shipping services returned by the carriers. - Length, Width, Height – add box measurements into corresponding fields.
- Weight – the weight of the empty box without any products inside. which will be added to the total weight of the parcel before plugin will quote shipping rates.
- Inner Padding – it defines how much of the space from each side of the box should be reserved for extra packaging materials, which will effectively decrease space available inside of this box for the ordered items.
- Max Weight – it defines the total weight of the items that plugin can fit into a given box.
3. Hit Save changes button at the bottom of the settings page.
How to remove one or more boxes? #
1. Check checkbox on the left side of Enabled checkbox for every Box you would like to remove.

2. Hit Remove selected box(es) button.

3. Hit Save changes button at the bottom of the settings page.
How to enable or disable boxes plugin will use for packing orders? #
Plugin allows to disable and enable boxes that plugin will use for packing orders.
Typical use case is that you ran out of some boxes and would like plugin to use the rest of the boxes except the one which is temporary out of stock.
1. Uncheck / check Enabled checkbox, which is the second checkbox in the row.

2. Hit Save changes button at the bottom of the settings page.


One thought on “How to setup boxes used for shipping?”
Leave a Reply
You must be logged in to post a comment.
Unless parcel is overweight, it is unlikely the cause of not seeing any shipping rates. In order, to better understand why you might not see rates, it is the best to enable Debug Mode, then reproduce the issue and look if any error messages will be displayed above the cart, then you can send us debug log for investigation and we will be able to tell you what might be wrong.