Why WooCommerce Orders Stop Syncing With the Shippo Dashboard (And How to Fix It)
- What causes WooCommerce orders to stop syncing after an update?
- What changed in WooCommerce?
- The solution: Enable HPOS and Compatibility Mode
- How to enable HPOS and Compatibility Mode (step-by-step)
- Important: Allow WooCommerce to automatically backfill and sync your existing orders
- Final step: Confirm order sync with the Shippo dashboard
- Important notes before enabling HPOS
- Quick summary
Many WooCommerce store owners encounter an issue where their orders sync perfectly with the Shippo dashboard until they update WooCommerce.
After updating WooCommerce, orders suddenly stop syncing to the Shippo dashboard, even though everything worked correctly before.
This can be confusing and frustrating, especially when no clear error message is shown.
If this sounds familiar, don’t worry.
This is a known behaviour related to WooCommerce’s High-Performance Order Storage (HPOS), and it can be fixed with a simple settings adjustment.
What causes WooCommerce orders to stop syncing after an update? #
Before WooCommerce version 8.2, orders were stored using standard WordPress tables:
- wp_posts
- wp_postmeta
Many third-party plugins and integrations (including shipping services like Shippo) relied on these tables to read order data.
What changed in WooCommerce? #
WooCommerce introduced High-Performance Order Storage (HPOS), which stores orders in dedicated database tables optimized for speed and scalability.
Benefits of HPOS #
- Faster order queries
- Improved performance for large stores
- Better scalability
- Cleaner data structure
However, if Compatibility Mode is not enabled, plugins that still rely on the legacy WordPress posts table may fail to detect new orders, causing order sync issues.
The solution: Enable HPOS and Compatibility Mode #
To restore WooCommerce order syncing with your Shippo dashboard, you need
✅ Enable High-Performance Order Storage
✅ Enable Compatibility Mode (to sync orders back to WordPress posts)
🎥 Watch the step-by-step tutorial video here.
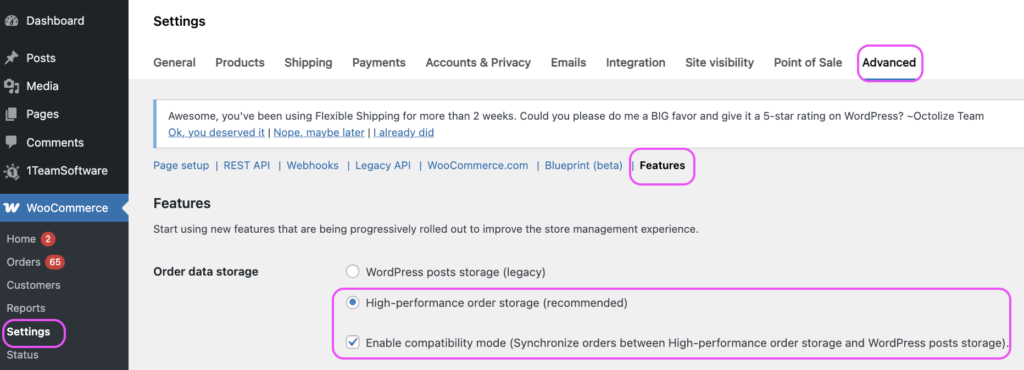
How to enable HPOS and Compatibility Mode (step-by-step) #
- Log in to WordPress Admin
- Go to WooCommerce → Settings → Advanced → Features
- Enable High-Performance Order Storage
- Enable Compatibility Mode (synchronizes orders to the posts table)
- Click Save changes
Please refer to the screenshot below for our recommended settings configuration.
Important: Allow WooCommerce to automatically backfill and sync your existing orders #
Once Compatibility Mode is enabled:
- WooCommerce schedules background actions to sync orders
- Orders are synced 25 at a time
- If you have many orders, multiple background jobs will run automatically
Optional (speed it up manually) #
- Go to WooCommerce → Status → Scheduled Actions
- Find the HPOS sync actions
- Click Run (visible when hovering over the action)
Final step: Confirm order sync with the Shippo dashboard #
After the synchronization completes:
- Newly placed orders should sync normally
- Existing orders will reappear in your Shippo order dashboard
- Shipping labels and rates should work as expected
💡 Recommendation:
Keep Compatibility Mode enabled for some time to ensure a smooth transition, especially if you use multiple WooCommerce plugins.
Important notes before enabling HPOS #
Before activating HPOS, make sure all WooCommerce extensions that rely on orders are active, such as:
- WooCommerce Subscriptions
- WooCommerce Bookings
- Other custom post-type extensions
Disabling these plugins before migration may cause data inconsistencies.
Quick summary #
After updating WooCommerce, orders may stop syncing to the Shippo dashboard due to High-Performance Order Storage (HPOS) and Compatibility Mode not enabled.
Fix: #
- Enable High-Performance Order Storage
- Enable Compatibility Mode
- Allow WooCommerce to sync existing orders automatically
- Orders will resume syncing to your Shippo dashboard
⚠️ Additional Troubleshooting: Firewall / Cloudflare Issue #
In some cases, orders may not appear in the Shippo dashboard even though everything seems to be configured correctly. This can be caused by security or firewall restrictions on your website.
What’s happening? #
Shippo processes orders using webhooks. After receiving a webhook from your WooCommerce store, Shippo sends a follow-up request to your WooCommerce REST API to retrieve full order details.
However, if your website is protected by services such as Cloudflare, hosting firewalls, or security plugins, these requests may be:
- Blocked
- Challenged by bot protection
- Stopped at the network level (before reaching your server)
In this case:
- The webhook may still return a 200 OK response
- But the Shippo API cannot complete the process
- As a result, the WooCommerce order will not appear in the Shippo dashboard
📍These blocks often do not appear in standard server logs, making the issue difficult to detect.
How to fix it #
To resolve this issue, you should review your security settings and allow Shippo’s requests:
- Check Cloudflare (if used):
- Review Firewall Rules
- Check Bot Protection / Security Level
- Disable or adjust rules that may block API requests
- Check server-level firewall (WAF):
- Hosting providers (e.g., managed WordPress hosts) may have built-in protection
- Review security logs if available
- Whitelist Shippo IP addresses:
- Shippo servers are hosted on Amazon Web Services (AWS)
- Ensure relevant IPs are allowed in:
- Cloudflare
- Hosting firewall / WAF
- Security plugins (if any)
Tip #
If you are encountering this issue, try temporarily lowering your firewall/security level and test again. If WooCommerce orders start syncing with your Shippo orders dashboard, it confirms that a security rule is blocking Shippo’s API requests.


