E-Commerce Shipping
How to Set Up Product Shipping Classes in WooCommerce (Step-by-Step Guide)
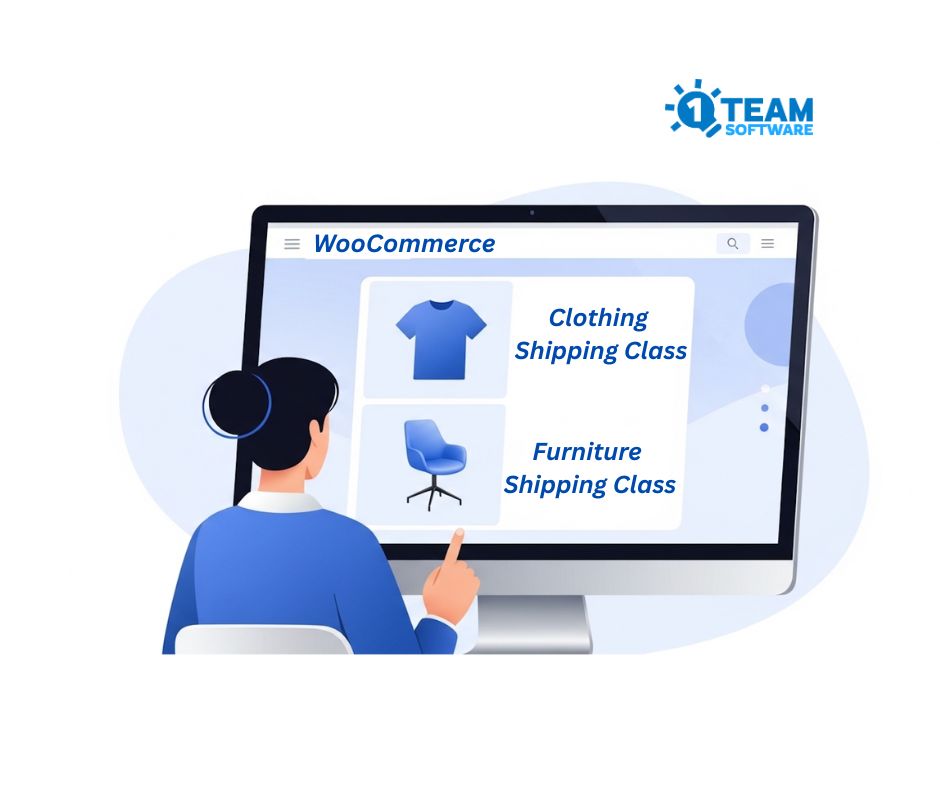
If you run an online store with WooCommerce, you’ve probably noticed that not every product costs the same to ship. A lightweight t-shirt doesn’t cost the same to ship as a heavy piece of furniture, and your customers definitely notice when the shipping feels off.
That’s where WooCommerce product shipping classes come in.
They give you a simple way to group products based on how they ship, so you can charge the right rates without overcomplicating things. In this tutorial, we’ll walk you through what shipping classes are, why they matter, and how to set them up step by step in your WooCommerce store.
What Are Product Shipping Classes in WooCommerce?
Think of shipping classes as labels you stick on your products to tell WooCommerce how to calculate shipping for them. You create a class like “Heavy Items” or “Fragile Goods,” assign it to the right products, and then configure your shipping methods to charge different rates based on those labels.
For example, you could have three classes:
- Standard: for regular-sized products that ship at your normal rate, or live shipping rates
- Heavy Items: for large or heavy products that cost more to ship
- Lightweight: for small items where you want to offer cheaper or free shipping
Each product in your store can belong to one shipping class. Once assigned, WooCommerce uses that shipping class to determine the shipping cost at checkout.
How Shipping Classes Improve Your Shipping Setup?
You might be wondering if this is really worth the effort, especially if you only have a few products. Here’s the thing: getting shipping costs right directly affects your profit and your customer experience.
You stop losing money on heavy items. For example, charging $8 shipping might make perfect sense for a small item like a book. But that same $8 won’t even come close to covering the cost of shipping something heavy, like a 50-pound bag of dog food.
Customers don’t just look at your product price; they look at the total.
For example, if someone sees a $15 shipping fee on a $10 phone case, it doesn’t matter how great the product is… it just doesn’t feel right.
That’s where shipping classes help.
Shipping class let you keep your shipping costs in line with what people are actually buying, so your pricing feels fair, and customers are much more likely to complete their purchase
As your store grows, shipping gets more complicated fast.
You might start with just candles. Then come candle holders, gift sets, maybe even larger display pieces. Suddenly, your simple shipping setup no longer fits everything you sell.
Shipping classes give you a system that scales with you, so you’re not constantly going back and rebuilding your shipping rules from scratch.
They also make promotions incredibly easy to run.
Want to offer free shipping on small accessories but not on bulky items or furniture? With shipping classes, it’s a quick adjustment, not a frustrating, time-consuming task.
Real-Life Scenarios Where Shipping Classes Save the Day
Let’s look at some practical examples to make this more concrete.
Scenario 1: A Store With Mixed Products
Sarah runs an online home décor shop.
She sells small items like throw pillows, medium-sized pieces like wall art, and larger items like furniture. The problem? They all cost very different amounts to ship.
Without shipping classes, she’s stuck with a bad choice: either overcharge for small items or lose money on the big ones.
So she set up a simple structure:
- Small Decor → $8 flat rate
- Medium Items → live shipping rates
- Furniture → live shipping rates
Now everything just works.
Each product automatically gets the right shipping cost at checkout, and Sarah doesn’t have to think about it every time an order comes in.
Scenario 2: Offering Free Shipping (Without Losing Money)
Mike runs a supplement store.
He sells lightweight items like vitamins and protein bars, but also heavier products like gym equipment and bulk powder tubs.
He wants to offer free shipping because it converts better, but only where it actually makes sense.
Here’s how he set it up:
- Supplements → Free shipping
- Equipment → Live shipping rates based on size and weight
Now his customers see free shipping on smaller items (which encourages more impulse buys), while he still charges appropriately for heavier shipments.
It’s a win-win better conversions without cutting into his margins.
Scenario 3: Different Shipping Needs for Different Products
Tom runs a farm-to-table delivery business.
Some of his products, like fresh produce, need to be shipped quickly and kept cold. Others, like jams and honey, can travel just fine with standard shipping.
If everything used the same shipping rate, it wouldn’t make sense. Customers buying a jar of jam would end up paying for expedited shipping they don’t actually need.
So Tom keeps it simple:
- Perishable Items → Expedited shipping services with a cold-pack surcharge
- Shelf-Stable Items → Standard ground shipping
Now each order is priced fairly based on what’s actually being shipped.
Customers who are just ordering jam aren’t stuck paying extra, and Tom still covers the cost of safely delivering fresh items.
How to Create Shipping Classes in WooCommerce
Now let’s move on to the actual setup. It’s straightforward and only takes a few minutes.
If you prefer a visual guide, we have also prepared a YouTube tutorial video to walk you through the process step by step.
📍Youtube Video: How to Create Shipping Classes in WooCommerce (Step-by-Step in 3 Minutes)
Step 1: Open the Shipping Classes Settings
From your WordPress dashboard
- Go to: WooCommerce > Settings > Shipping > Classes.
You’ll see a tab labelled Shipping classes. Click on it.
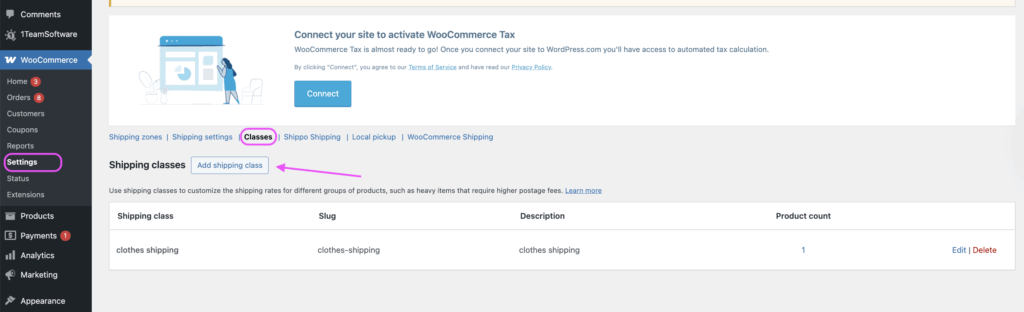
Step 2: Add a New Shipping Class
Click the Add shipping class button. You’ll need to fill in three fields:
- Shipping class name: This is just a clear label, like “Heavy Items” or “Fragile.” You’ll see this name later when assigning it to products, so keep it easy to recognize.
- Slug: A URL-friendly version of the name. WooCommerce usually fills this in automatically. For example, “Heavy Items” becomes heavy-items. You can leave it as is in most cases.
- Description: This one’s optional, but it can be really helpful/ A short note like “Products over 20 lbs that need special handling” keeps everything clear and organized.
When you’re done, click “Create” to save the newly created shipping classes.

Step 3: To edit or remove a shipping class:
You can manage your shipping classes from the same place where you created them.
- Go to WooCommerce → Settings → Shipping → Classes
- Find the shipping class you want to update
- On the right side, you’ll see two options: Edit and Delete
- Click Edit if you want to update the name, slug, or description
- Click Delete if you no longer need that shipping class

If you make any changes, don’t forget to click Save to apply them.
Step 4: Assign a Shipping Class to a Product
To apply specific shipping rules, you’ll need to assign shipping classes to your products.
For example, you might assign a product to a “Heavy Items” class so it uses the correct shipping method and charges the proper cost.
Keep in mind, each product can only have one shipping class at a time.
Follow the steps below to assign a shipping class to individual products:
- Go to WooCommerce > Products.
- Find the product you want to assign a shipping class to and click Edit.
- For simple products:
- Go to the Shipping tab, then choose the appropriate option from the Shipping class dropdown.
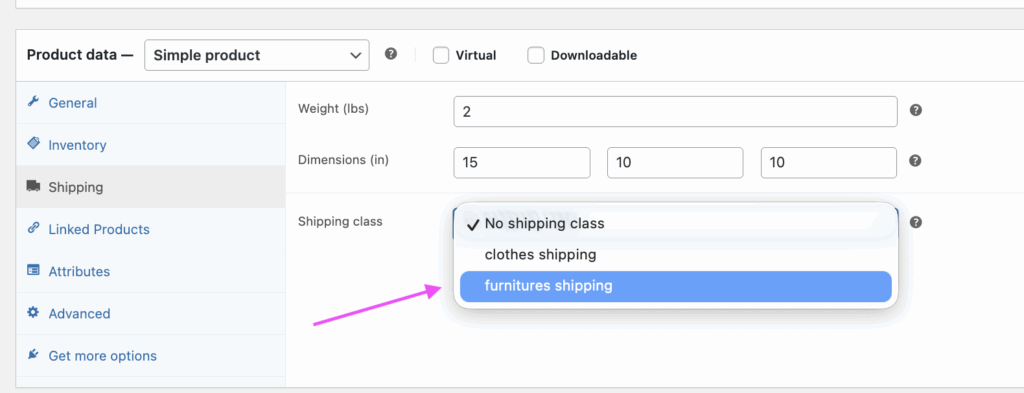
- For variable products:
- You can assign a shipping class to the main (parent) product the same way as a simple product.
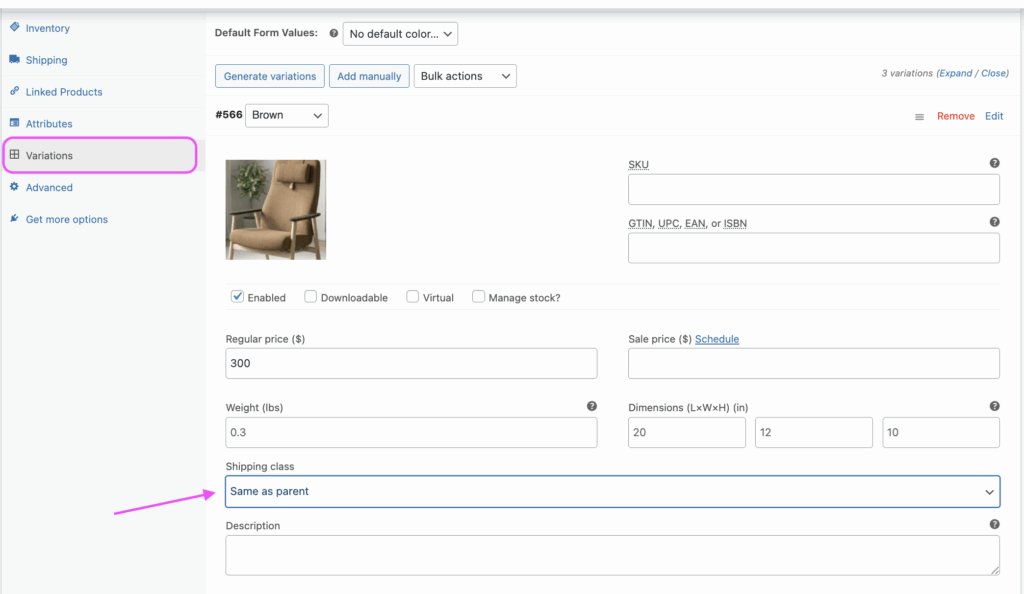
If needed, you can also set different shipping classes for each variation.
To do this, go to the Variations tab, open the variation you want to update, and select the suitable shipping class from the dropdown.
3. Update the product to save changes.
Step 5: Assign Shipping Classes in Bulk
If you have a lot of products to update, doing them one by one would take forever. WooCommerce has a built-in bulk editing feature for this.
Go to Products → All Products.
Check the boxes next to the products you want to update. From the Bulk actions dropdown, select Edit and click Apply.
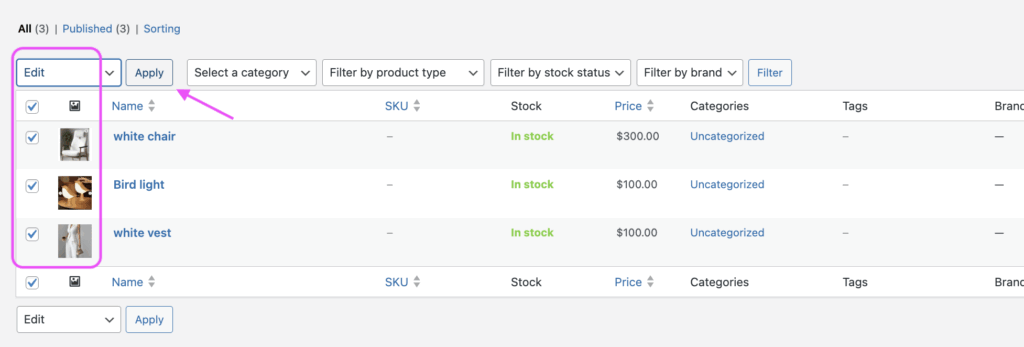
A bulk editing panel will appear.
Look for the Shipping class dropdown, select the shipping class you want to apply to the selected products, and click Update.
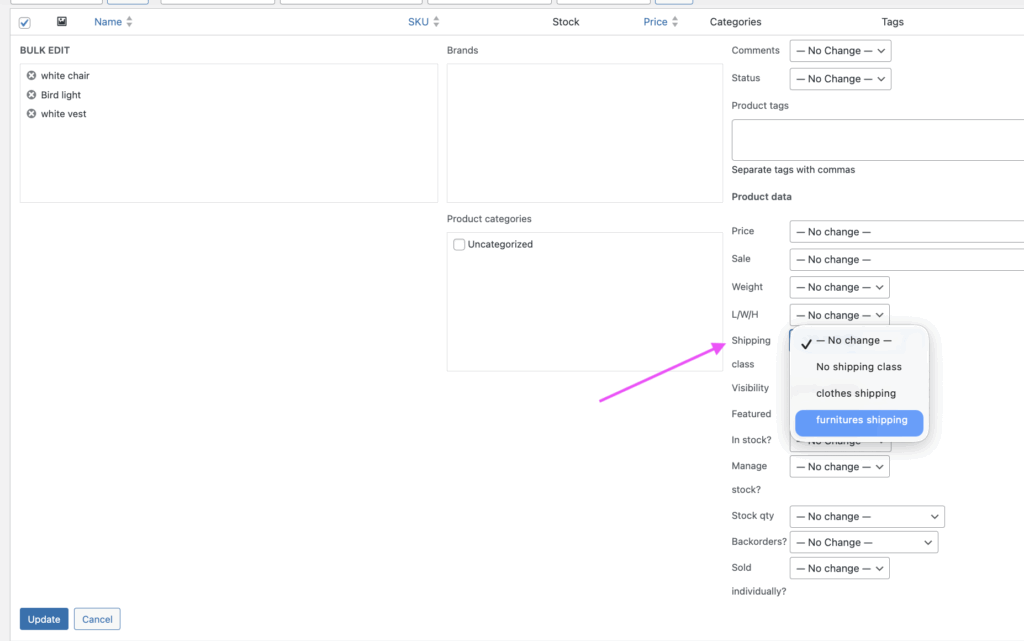
All selected products now have the new shipping class assigned
Tips for Getting the Most Out of Shipping Classes
Here are a few things worth keeping in mind as you set this up:
- Keep your shipping class names clear and simple
“Heavy” is better than “Category A”. When your store grows, and you’re dealing with hundreds of products, you’ll be glad you kept things straightforward.
- Don’t create too many shipping classes.
Three to five classes usually cover most stores. If you find yourself creating a dozen, you’re probably overcomplicating things.
- Review your setup from time to time
Shipping carrier rates change, your product mix evolves. What worked a few months ago might not make sense today, or could even be costing you money.
- Always test your checkout
After setting everything up, add different product combinations to your cart and go through checkout. This helps you catch any issues before your customers do.
- Remember: one shipping class per product.
WooCommerce only allows a single shipping class per product. If a product could fit into multiple categories, choose the one that best fits.
Frequently Asked Questions
📍Can I assign more than one shipping class to a single product?
No. WooCommerce limits each product to one shipping class. If you have a product that fits multiple categories, assign the class that best represents how it should be shipped and priced.
📍What happens if I don’t assign any shipping class to a product
If a product doesn’t have a shipping class assigned, WooCommerce will simply use the default rate (often labelled as “No shipping class cost”) from your shipping method settings.
So it won’t be excluded or cause any issues. It just falls back to your standard shipping rate.
📍Do shipping classes work with all shipping methods?
Shipping classes integrate primarily with the Flat Rate shipping method built into WooCommerce. Our live shipping rate plugins, such as Shippo Shipping PRO, ShipStation Shipping PRO, and EasyPost Shipping PRO, fully support shipping classes.
This means you can display accurate, real-time shipping rates based on the shipping class assigned to each product, giving your customers more precise pricing at checkout.
📍Can I use shipping classes to offer free shipping on certain products?
Yes. You can set a specific shipping class to have a $0 cost in your Flat Rate settings, which effectively gives those products free shipping.
If you need more flexibility, for example, offering free shipping based on shipping class, order total, user role, or specific product tags, you can use our Free Shipping per Package PRO plugin.
It allows you to create more advanced rules, so you can offer free shipping exactly where it makes the most sense for your store.
📍Will shipping classes affect my shipping zones?
Not directly. Shipping classes work within shipping zones. You set up your shipping zones first (defining geographic regions), and then configure shipping class-based rates inside each shipping zone. A product’s shipping class might cost $10 in one zone and $20 in another.
📍I have variable products; can each variation have its own shipping class?
Yes. WooCommerce lets you assign a different shipping class to each product variation. This is useful when variations differ significantly in size or weight, for example, a small candle vs. a large candle set.
📍How do shipping classes interact with table rate shipping?
If you use a table rate shipping plugin, shipping classes typically serve as one of the conditions you can use to define rates.
📍Can I rename or delete a shipping class after creating it?
Yes. You can edit the name, slug, or description of any shipping class from the same settings page where you created it. You can also delete shipping classes. Just keep in mind that products assigned to a deleted class will revert to having no shipping class.
Summary
Setting up product shipping classes in WooCommerce doesn’t take long, but it can make a real difference in how your store handles shipping costs. Whether your goal is to protect your margins, improve the checkout experience, or boost conversions with smarter shipping, shipping classes give you the control to do it right.
Start with two or three shipping classes based on your most obvious product groups. Test a few different scenarios in your cart, see how the rates look, and adjust as you go.
Over time, you’ll find what works best, and both your margins and your customers will benefit from it.
Take Your Shipping Setup Further
If you want more control and flexibility beyond basic shipping classes, these plugins can help you go a step further:
📦 Shipping Packages for WooCommerce (Free plugin)
Group products by shipping class and split them into separate packages automatically.
→ Ideal if you want each product group to calculate its own shipping cost, especially useful for stores with mixed product types.
🚚 Live Shipping Rates (Shippo Shipping PRO, ShipStation Shipping PRO, EasyPost Shipping PRO) (Free version available)
Show real-time shipping rates from carrier at checkout based on the shipping class assigned to each product.
→ Perfect for giving customers accurate shipping costs and avoiding undercharging or overcharging on shipping.
🎯 Free Shipping per Package PRO for WooCommerce (Free version available)
→ Create advanced free shipping rules based on conditions like shipping class, order total, product tags, and more.
How to Choose
- Just getting started?
→ Use Shipping Packages for WooCommerce (Free plugin) to organize your shipping by product type. - Want accurate carrier rates?
→ Go with Live Shipping Rates plugins (free version available) to display live shipping rates at checkout. - Need full control over promotions?
→ Use Free Shipping per Package PRO (free version available) to create smart, conditional free shipping rules.
Great for running targeted promotions (like free shipping on small items) without losing money on heavier products.
💡 Pro tip:
Combine shipping classes with these tools to build a flexible, scalable shipping setup that grows with your store.
🔥 Recommended Setup (Best Conversion)
👉 Combine all three:
- Use Shipping Classes → to group products
- Use Shipping Packages Per package for WooCommerce plugin → to split shipments by shipping class properly
- Use Live Shipping Rates plugins → for accurate shipping cost
- Use Free Shipping Per Package PRO → to boost conversions
This gives you a complete, scalable shipping system that:
- protects your margins
- improves checkout experience
- increases conversion rates