How to Compare Shipping Rates Between the Plugin and the Service Dashboard – With an order
When using WooCommerce shipping plugins, a common issue is that the shipping rates dispalyed to customers may differ from those displayed in the shipping service’s dashboard.
The main reason for this issue is usually a difference in how the plugin calculates package dimensions and weight compared to what’s entered in the shipping service’s dashboard. Small variations in weight or dimensions can lead to differences in shipping rates.
This guide will help you identify and resolve these discrepancies by comparing shipping rates calculated by WooCommerce shipping plugins—such as Shippo Shipping Pro, Shipstation Shipping Pro, EasyPost Shipping Pro, and ChitChats Shipping Pro, etc. with the rates displayed in your shipping provider’s dashboard (e.g., the EasyPost Dashboard).
By understanding these factors, you can fine-tune your shipping plugins settings to ensure the correct live shipping rates are displayed in the cart.
Differences in shipping rates typically occur because of:
- Discrepancies in package dimensions/weight: The dimensions and weight of the package used in calculations might differ.
- Rate adjustments: Modifications or adjustments within the plugin can affect the final rates.
Follow these steps when you suspect that the shipping rate returned from the particular order is higher or lower than the shipping rates you obtain from the services dashboard.
Step 1: Obtain Shipping Rates and Package Information from the Shipping Plugin #
For demonstration purposes, we are using the EasyPost Shipping Pro plugin as an example.
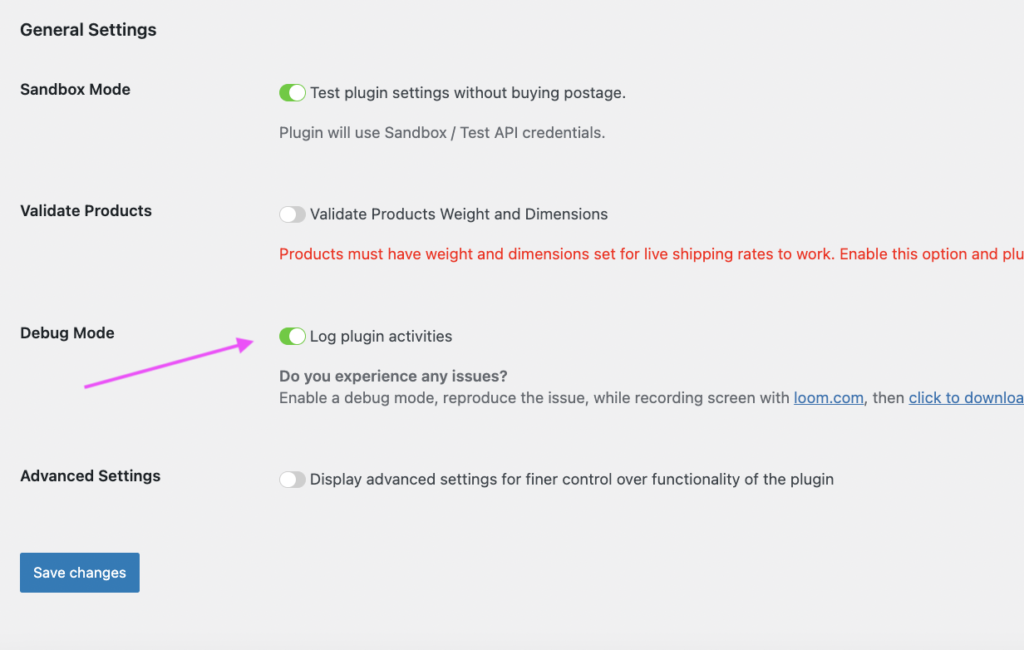
1. Enable Debug Mode:
- Navigate to the General tab in the plugin settings.
- Enable Debug mode.
2. Go to the order which you expect has a shipping rate discrepancy
- In the demonstration example, it’s order#237.
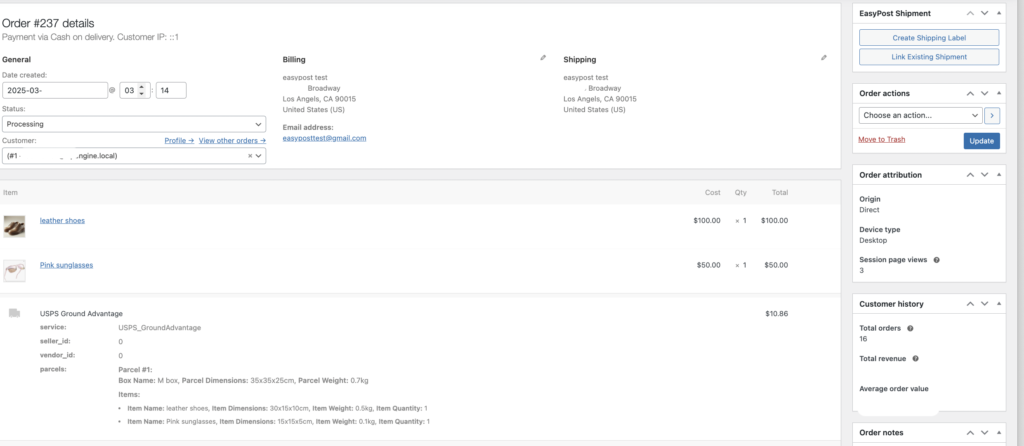
3. Check the package dimension/weight information
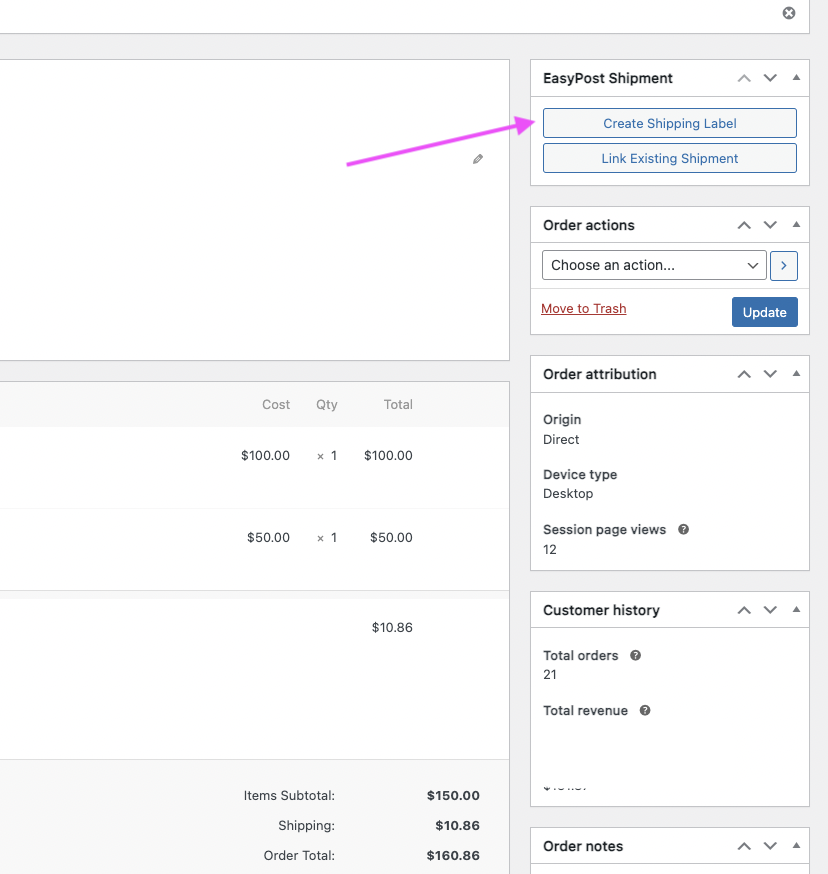
- click the “Create Shipping Label” button
- You will see which shipping box the shipping plugin has selected for shipping
- The shipping box the plugin selected will be showing as “Detected” as the screenshot below.
- Check if the package’s width, height, and weight calculated by the plugin match the actual package dimensions and weight.
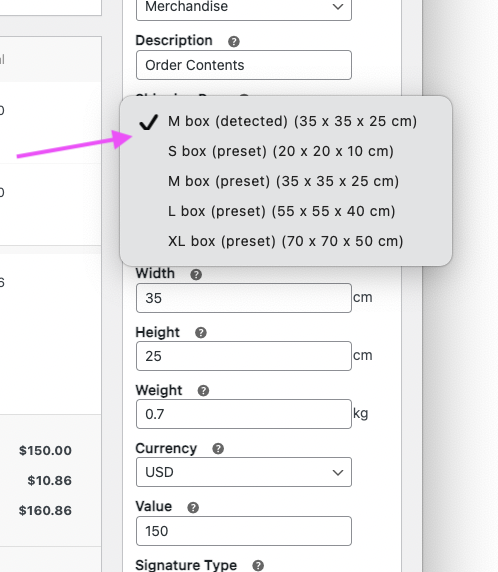
If there are multiple shipping boxes required and selected for this order by the plugin, you will see how multiple boxes are showing as “Detected” and the dimension/weight of each box.
4. View Shipping Rates:
- Click on “Get a Quote”
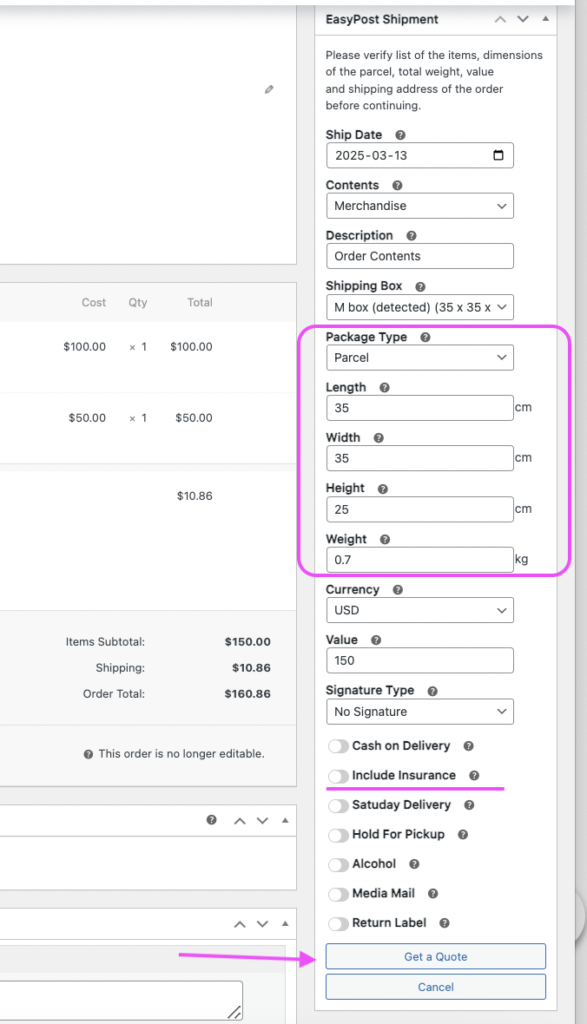
You’ll then see the shipping rates for all available services based on the selected shipping package. By default, the live shipping rate for the service chosen by the customer will appear at the top, as shown in the screenshot below.

- Important information:
The shipping rates displayed for the shipping label are the original live shipping rates provided by the Shipping Services API, without any modifications.
However, if you’ve applied a rate adjustment in the settings, such as adding an extra $2 to the shipping cost, the amount the customer pays will be higher than the actual carrier rate shown on the shipping label.
5. Based on the above steps, you have collected the necessary package information.
6. Capture a Screenshot:
- Take a screenshot of the detected shipping box dimension/weight information and the shipping rates.
- For example, if the USPS Ground Advantage shows a rate of US$10.86, note it for later comparison.
Step 2: Verify Package Information on the Service Dashboard #
Scenario A: If you haven’t created a shipping label for the order yet #
1. Access the Dashboard:
- Log in to your service dashboard. In this example, the EasyPost Dashboard.
- Go to the Shipment section.
2. Create a New Shipment:
Click the Buy A Label button in the top right corner.
3. Enter Shipment Details:
- Input the recipient’s shipping address and related information.
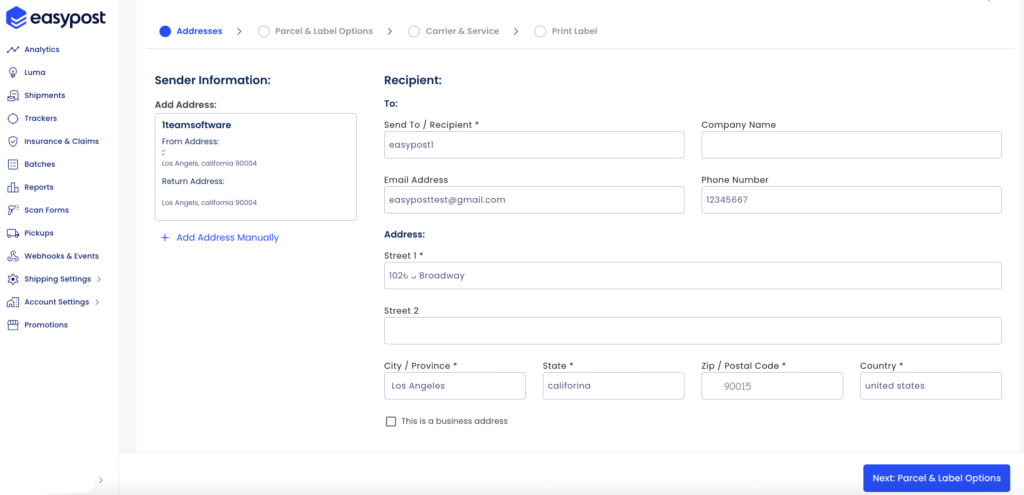
- Enter the package dimensions and weight.
- Click Next Carrier & Services.
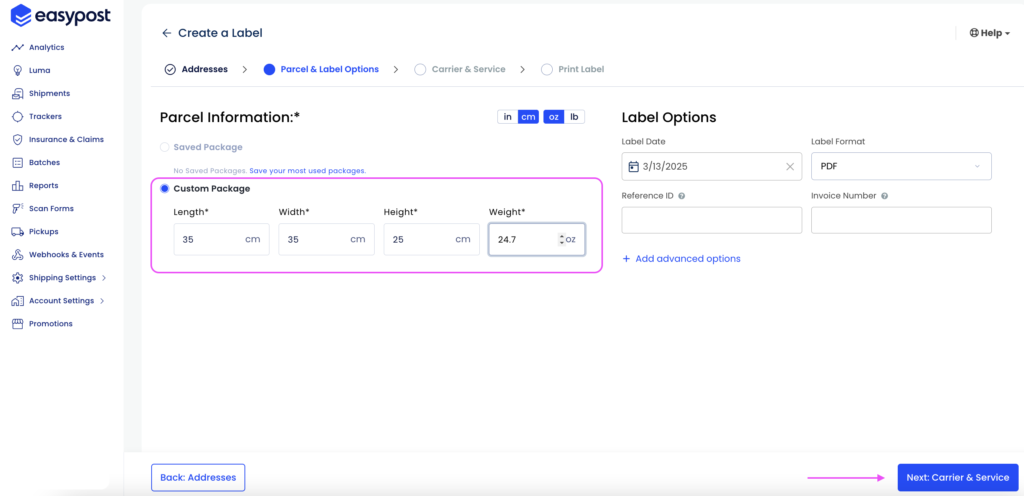
4. Confirm the Details:
- Verify that the package dimensions and weight match those displayed in the plugin.
- Compare the shipping rates provided on the dashboard with those from the plugin. For instance, check that the USPS Ground Advantage rate is US$10.86.
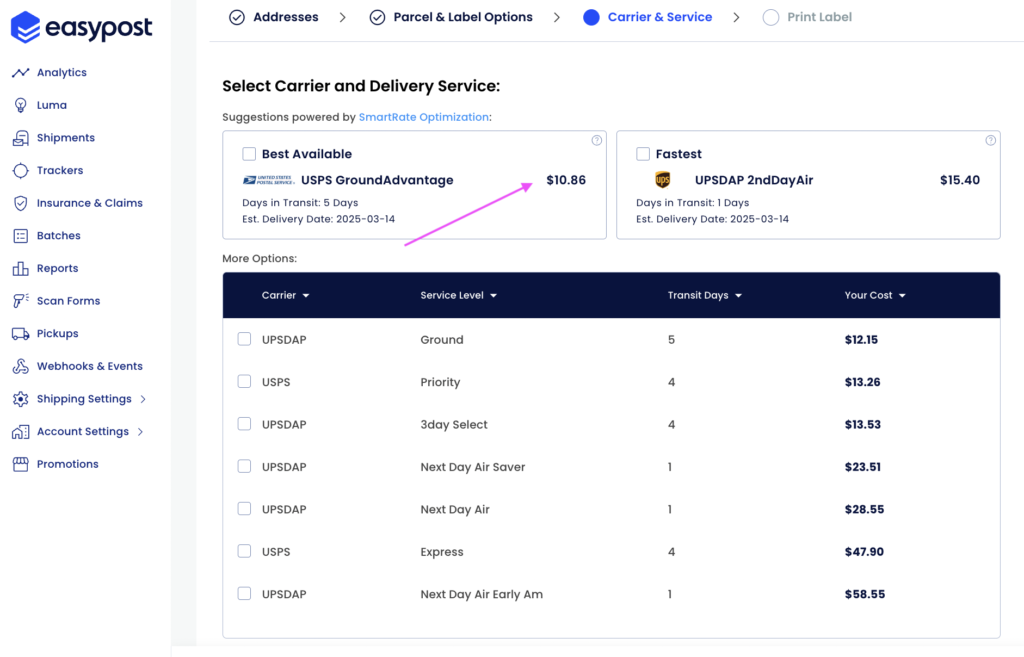
5. Capture a Screenshot:
- Take a screenshot of the shipping rates and package details from the EasyPost Dashboard for further comparison.
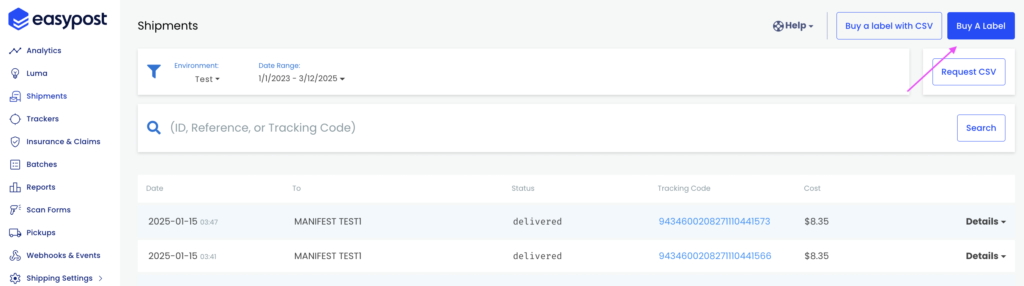
Scenario B: If you’ve already purchased the shipping label or shipped the order #
- Go to the shipment listings section, such as the EasyPost shipment tab.
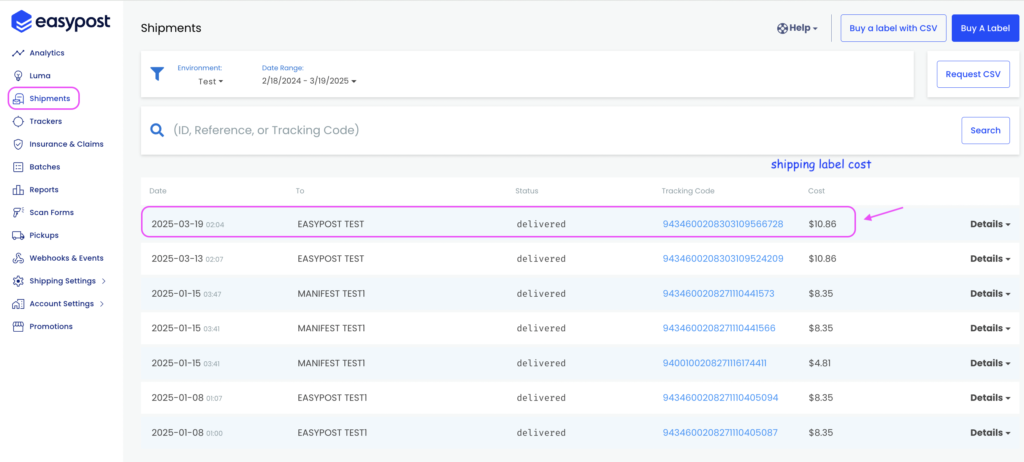
- Check the shipment detail information of the order#237 you wish to compare shipping rates.
- Take a screenshot of the shipping address and package dimensions/weight, then compare them with the details from the plugin to ensure they match.
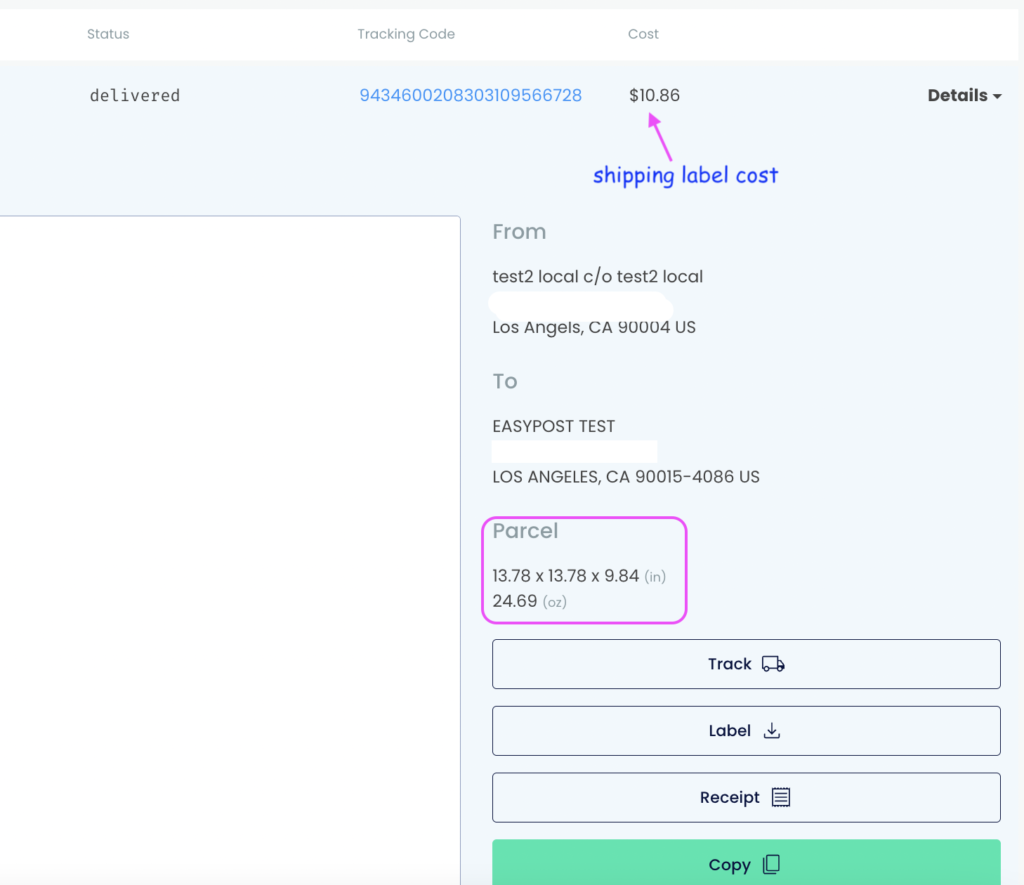
- Compare the shipping rates from the shipping service you used to purchase the shipping label with the live shipping rates calculated by the plugin to ensure they match.
Final Comparison #
With screenshots from both the WooCommerce shipping plugin and the Services dashboard (eg EasyPost Dashboard):
- Ensure that the package dimensions and weight are consistent.
- Confirm that the shipping rates for the selected services (e.g., USPS Ground Advantage) match what the customer selected.
If you notice any rate discrepancies, verify the settings in the plugin and re-check the package information to ensure accurate rate comparisons.
Related documentation:
If you are using Shippo Shipping Pro, please refer to the Shippo – rate difference from the dashboard
If you are using ShipStation Shipping Pro, please refer to the article ShipStation – rate difference from the dashboard


