
How to Enable and Activate Carriers in Your Shippo Account
3 min read
If you are using the 1TeamSoftware Multi-Carrier Shippo Shipping PRO plugin for WooCommerce, you need to ensure that the shipping carriers you want to use are enabled and active inside your Shippo account.
While some Shippo carrier accounts (like USPS, UPS, or DHL Express) are pre-negotiated and enabled by default, you may still need to configure, activate, or select specific shipping service levels to make them work properly with your WooCommerce store.
This guide and video tutorial walk you through enabling and activating shipping carriers and shipping services (using USPS as an example) inside your Shippo account. Once configured, you can retrieve real-time shipping rates and create shipping labels directly within the Shippo Shipping PRO plugin from your WooCommerce store.
Video Tutorial: How to Enable and Activate Carriers in Shippo #
For a quick walkthrough, watch our step-by-step video:
Link: Shippo Shipping PRO: how to enable and activate carriers
Why Configure Carrier Settings in Shippo? #
- Live Rates at Checkout: Select exactly which carrier shipping service levels (e.g. Ground Advantage, Priority Mail) to present to your customers for your WooCommerce store.
- Accurate Test Environments: Toggle Test Mode to verify your WooCommerce shipping configuration without paying for real shipping labels.
- Customized Rates: Ensure all carrier accounts you want to use are enabled so they sync properly to your Shippo Shipping PRO plugin.
Step-by-Step Guide #
Follow these steps to enable and configure carriers in your Shippo account:
Step 1: Navigate to the Carriers Dashboard #
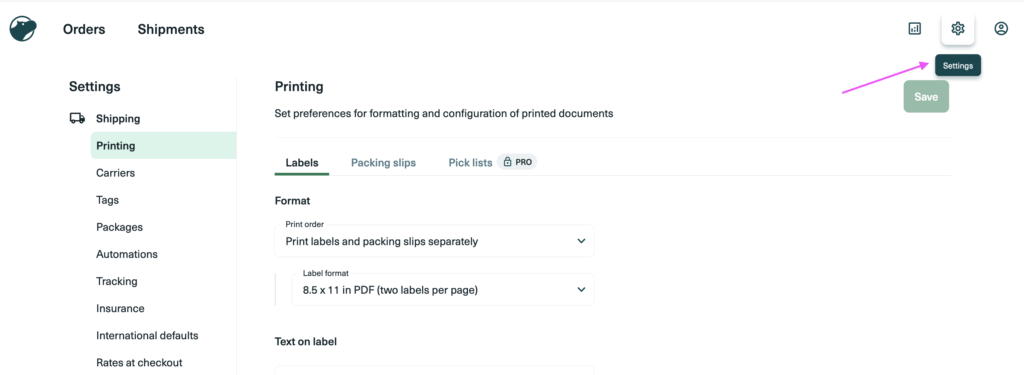
Log in to your Shippo dashboard. From the left-hand sidebar menu, click on Settings (gear icon) and select Carriers.
Step 2: Enable the Carrier #
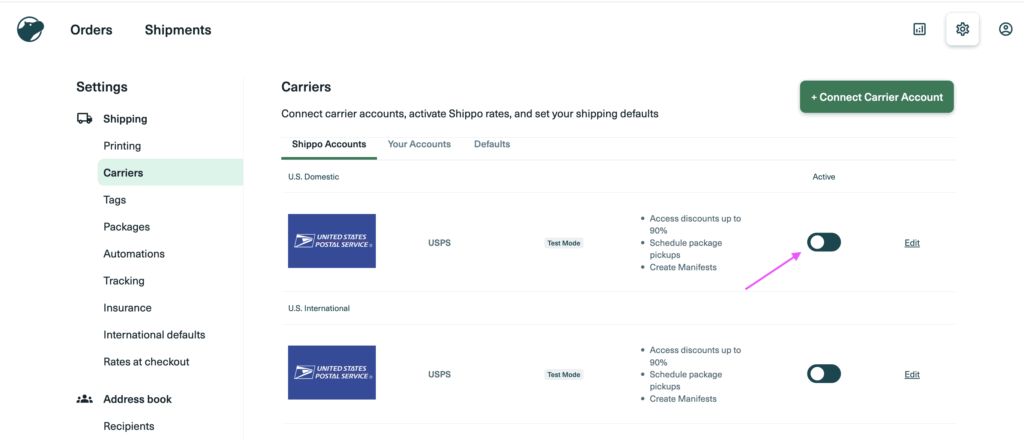
In the Carriers dashboard, locate the carrier you wish to use. Click the toggle switch on the right side of the carrier card to enable the service. In this demonstration, we will use USPS as an example carrier.
Step 3: Edit Carrier Settings #
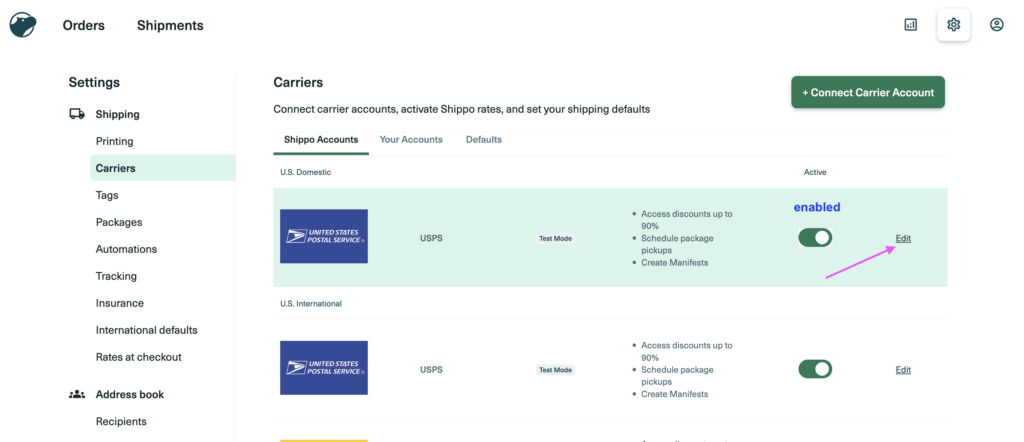
Click the Edit button on the carrier card to open the shipping services settings panel. (In this example, we will click Edit to customize the USPS shipping services.)
Step 4: Configure Services and Test Mode #
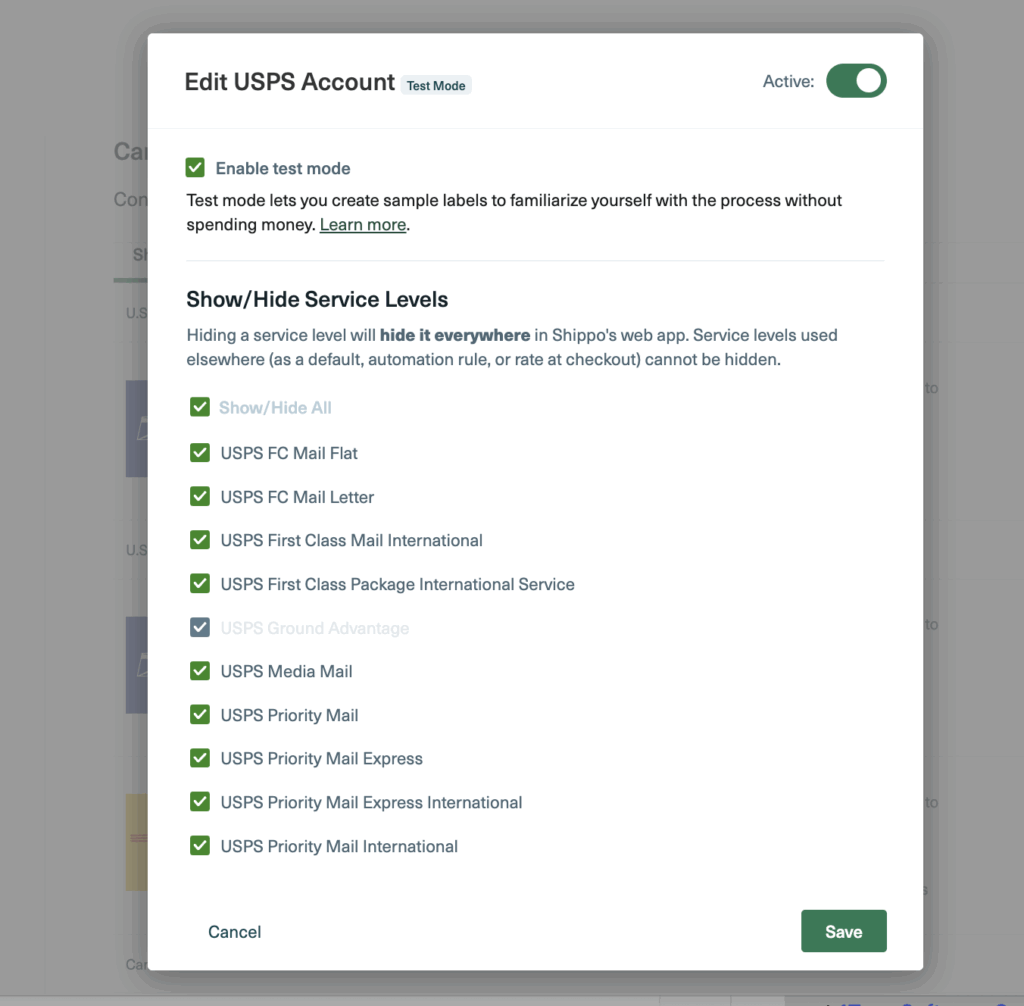
A side panel will open. Configure your preferences:
- Active status: Ensure the Active toggle switch at the top is enabled.
- Test Mode: Toggle the Enable test mode checkbox if you want to test shipping rates without making live shipments.
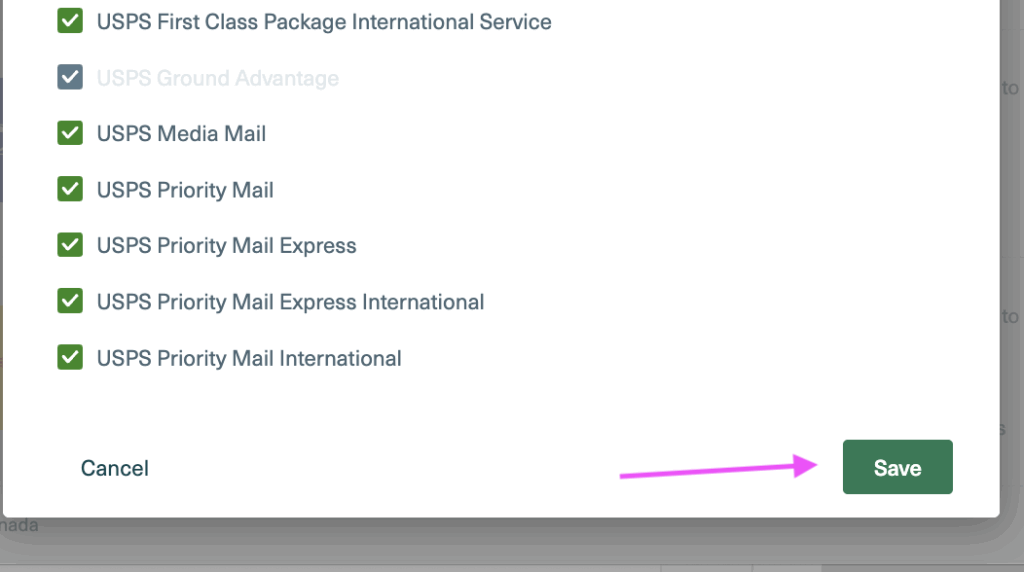
- Shipping Service Selection: Check the boxes for the specific shipping services you want to make available (e.g. USPS Ground Advantage, USPS Priority Mail).
Step 5: Save Settings #
Scroll down to the bottom of the panel and click the green Save button to apply the changes.
IMPORTANT
Testing Mode Reminder:
While the carrier account is in test mode, the live shipping rates returned by the Shippo API to the Shippo Shipping PRO plugin may not be fully accurate, as test mode is intended for demonstration and testing purposes only. For precise live shippng rates at checkout, make sure to switch your carrier connection to production mode.
What to do Next? #
Once your carriers and shipping services are configured in Shippo:
- Navigate back to your WordPress admin panel.
- Go to WooCommerce > Settings > Shipping > Shippo Shippo PRO plugin.
- In the plugin settings, refresh your shipping services list to sync the newly enabled carriers service levels.
- Configure your shipping zones start offering these carrier services to your customers!
Frequently Asked Questions (FAQ) #
How do I connect my own custom carrier account (e.g., UPS, FedEx, or DHL) to Shippo? #
To connect your own carrier accounts and use your negotiated rates, go to the Carriers settings page in your Shippo dashboard, click the green + Connect Carrier Account button at the top-right, choose your carrier, and fill in your personal account details/credentials.
Why are test mode rates in Shippo different from production rates? #
Test mode uses sandbox environments to simulate shipping operations. Because carriers do not always keep test environment rates in sync with live production rates, the shipping rates returned in test mode may not be completely accurate. However, we always recommend using test mode first to test the Shippo Shipping PRO plugin integration and ensure it retrieves shipping rates for your WooCommerce store properly. Once testing is complete, you can switch both your plugin settings and Shippo account to production mode to retrieve precise live shipping rates.
Do I need multiple Shippo accounts to use different carriers? #
No. A single Shippo account can handle all your carrier integrations (including USPS, UPS, DHL, FedEx, and international regional carriers) at the same time, allowing you to compare shipping rates and print shipping labels from the Shippo Shipping PRO plugin within your WooCommerce store.
How do I sync newly activated carriers to my WooCommerce store? #
After enabling and activating carriers in your Shippo account, save the settings. The Shippo Shipping PRO plugin will sync all active carrier shipping services and make them available for your shipping services settings within the plugin.
Related article:
📍 How to configure shipping services in the WooCommerce shipping plugin?
📍 How to configure shipping boxes in the WooCommerce shipping plugin?
#
Need Help?
- Shippo Account Setup Guide: please contact Shippo’s support
- Support & Feedback for the plugin: For questions, custom implementations, or troubleshooting regarding the Shippo Shipping PRO plugin, contact us at 1TeamSoftware Contact Us.


